
To add a Table dashlet to a custom dashboard
To configure or export the table in the dashlet
To view further information on a managed object
The Table dashlet displays data in a tabular form.
The Table dashlet is applicable to all types of data source.
To add a Table dashlet to a custom dashboard:
- When adding a dashlet to a new custom dashboard or editing an existing custom dashboard, follow the instructions for adding a dashlet, select Table in the Select Dashlet Type, and click Next.
- The Create Dashlet form will slide in on the right.
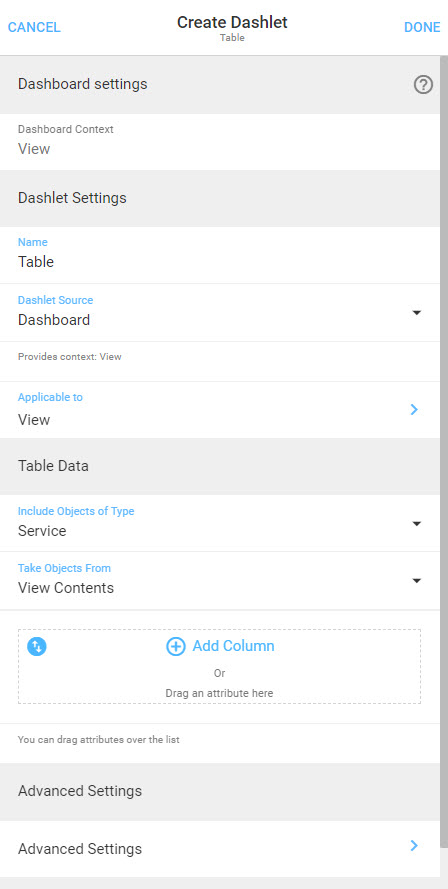
Dashlet Settings
- Enter a name for your dashlet in the Name field.
- You can then choose the source of the data to be displayed in the dashlet.
- If you want this dashlet to source its data from the context of its parent dashboard, select Dashboard. You can see the context of the parent dashboard in the Dashboard Context field at the top of the form.
- If you want this dashlet to source its data from another dashlet in this current dashboard, select Dashlet.
- If you want this dashlet to source its data from a managed object on your network, select Fixed Object. You can then click Browse to an object to search for a managed object in Explorer, or drag into the box your desired managed object in from another browser window.
Table Data
- Specify the types of object data you want to include in the table, e.g. Port, Service, Fan, Memory etc in the Include Objects of Type field. This will determine the column types you can include in below in the Columns field.
- Click the +Add Column button in the Columns field to open the Add Column form, by which you can add columns to the table. The types of columns you can select will depend on the selection made in the Include Objects of Type field above. You can add as many columns to the Table dashlet as you want. The selected columns will be listed below.
- Specify the column metric from the Column dropdown field.
- Specify the column name of the column heading in the Heading field.
- Click the Advanced Settings field to open the Advanced Settings form.
- Specify the Aggregation Method by which the column is populated from the dropdown field. An explanation is provided for each option.
- (From Entuity v21.0 upwards) Specify the Format of column (by default 'Automatic'), if you want to override the default 'Display Type' of the column. If switched to 'Custom', you can specify your preferred format from the Display Type dropdown field. E.g., you might want to modify a 'Last Reboot Time' attribute to 'Time since timestamp' and see the uptime, or you might select 'string' to display raw, unformatted values, or you might change the number of decimal places used for % data.
- Specify whether to show or hide a column by default.
- Click on a column in the list to open its Edit Column form. Here, you can change the column attribute, change the column name, or delete the column. Click Done in the top right of the form to save your changes, otherwise click Cancel.
Advanced Settings
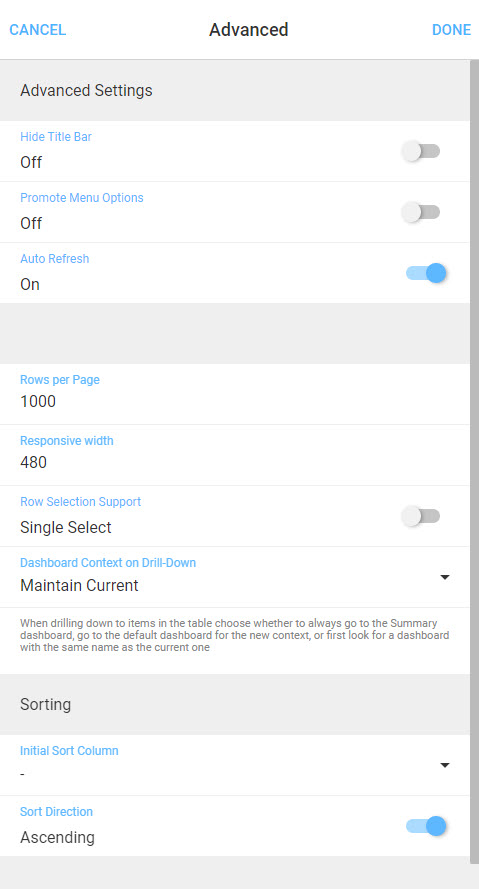
- Click the Advanced Settings field to open the Advanced Settings form.
- Choose whether you want to hide the title of the dashlet in the Hide Title Bar field. If selected, the dashlet's Overflow Menu will also be hidden, but in the Promote Menu Options field you can then choose if you want to display the options in the dashlet's Overflow Menu in the overall dashboard's Overflow Menu.
- Choose whether you want the dashlet to automatically refresh in the Auto Refresh field. By default this is set to On.
- Specify the display of Rows per Page, by default set to 1000.
- Specify the display Responsive width in pixels at which point the dashlet becomes responsive, by default 480.
- In the Row Selection Support field, specify whether you want to restrict users to selecting single rows in tables, or to enable multi-select.
- In the Dashboard Context on Drill-Down field, specify the dashboard to which you will navigate when drilling down into a service. Choose one of the following three options:
- Summary dashboard - you will be navigated to the Summary dashboard for the selected object.
- Default - you will be navigated to the default dashboard for the selected object.
- Maintain Current - you will be navigated to a dashboard with the same name as the current dashboard.
- In the Initial Sort Column and Sort Direction fields, specify the manner by which the table will be sorted.
-
From Entuity v19.0 P03 upwards, you can specify table filters when creating a table dashlet. Use the Apply Filter field to specify any filters you would like to add. When you create a set of filters, each filter is added together to create an AND list, not an OR list. Essentially, you would be filtering on results of the previous filter.

If so, click +Add Filter to open the Add New Filter form.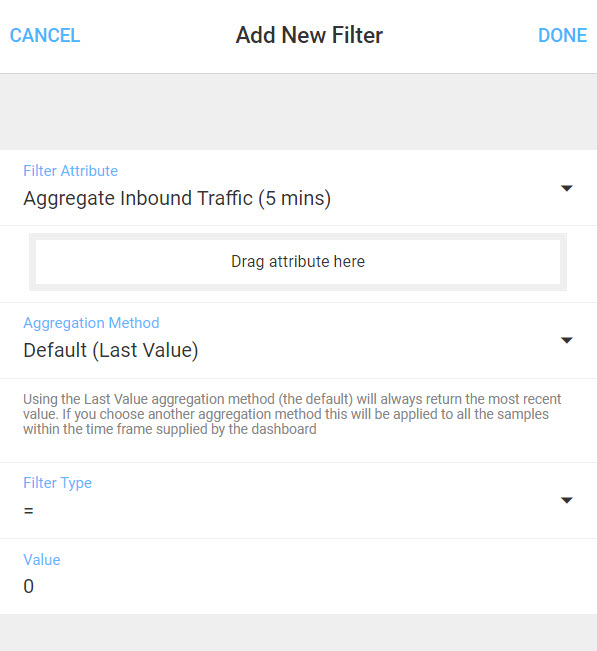
Specify the Filter Attribute by which you want to filter the table, or drag one in from the Drop Box or another tab. You can specify an attribute that is not necessarily displayed in the table dashlet already.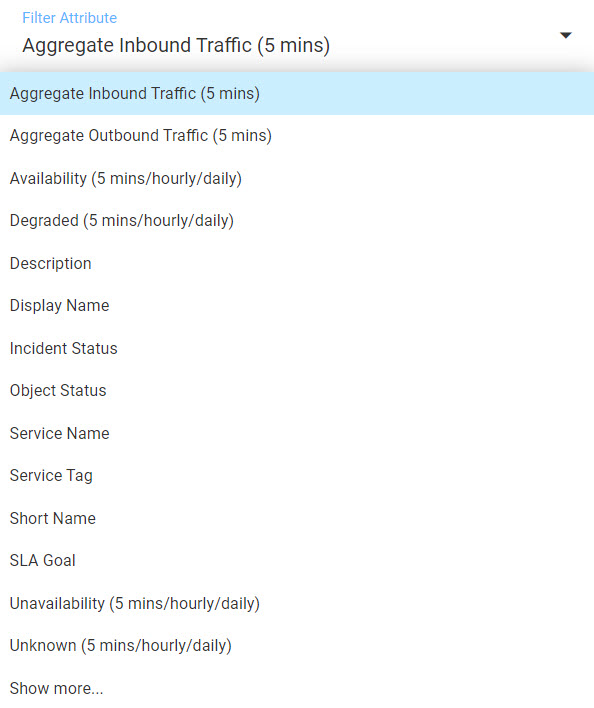
Then specify the Aggregation Method by which the filter is chosen from the dropdown list. Once selected, a description of the selected method will appear beneath the field.
Next, specify the Filter Type from the dropdown list and the Value applicable to the selected filter type.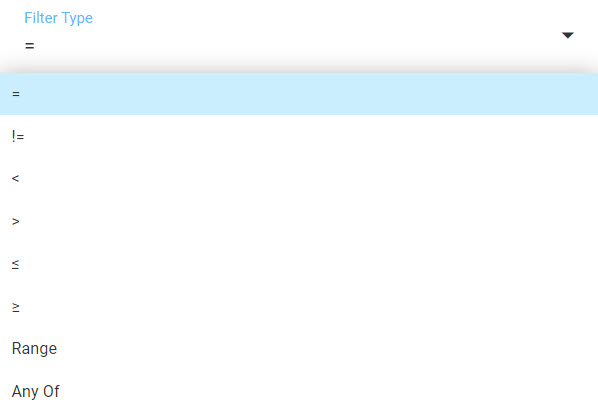
Click Done to save your filter, otherwise click Cancel.
- Click Done in the top right of the form to save and return to the Create Dashlet form, otherwise click Cancel.
When you have set all of your parameters, click Done in the top right of the form to save your dashlet changes, otherwise click Cancel.
To configure or export the table in the dashlet:
- Please see the article on configuring tables in Entuity.
To view further information on a managed object:
- Right click on an object to open its context menu, in which you will find further management options.
Comments
0 comments
Please sign in to leave a comment.